

|
Jane's
Quick Tips Tip 24 Applying Custom Animation Effects |

|
Apply Animation |
||
In addition to applying
animation effects to an object, you can build a slide with individual
lines of text or add special visual effects. You can add custom animation effects to bulleted items, text, or other objects such as charts, graphics, or SmartArt graphics. This feature provides
a range of animation effects, text introduction, and appearance options. |
||
| The 4 groups of Animations include: Entrance, Emphasis, Exit, and Motion Paths. | ||
 |
 |
|
| Figure 1: Animation tab, Advanced Animation group, Add Animation button | Figure 2: Advanced Animation group | |
Procedures: |
||
| 1. Switch to Normal view. 2. Go to the slide containing the object you want to animate. 3. Click on the Animations tab, and then in the Advanced Animations group, click the Animation Pane button. The Animation pane opens on the right side of the window, and it is empty until you add your animations. |
||
4. To add an animation, in the Advanced Animations group, click the Add Animation button (see Figure 2 above), and then choose an animation effect from one of the following 4 groups:
|
 |
|
| Figure 3: Animation gallery |
||
|
||
 |
||
5. To preview the animations
on a slide click the Play button on the Animation pane or under the Preview group on the Animation tab. |
||
You can also reorder your animations under the Animation tab in the Timing group under the Reorder Animation, you can click on the Move Earlier or Move later buttons. |
||
 |
||
Setting Effect and Timing Options: |
||
1. After animation is applied, you can set effect options.
|
||
2. In the Start list, do one of the following:
|
 |
|
| The animated items are noted on the slide by a non-printing numbered tag that correlates to the effects in the list. This tag does not show up in the slide show view. If you set your animation on the slide to start automatically (Start After Previous), it will be marked as "0" and will start as soon as the slide appears in the slide show. | ||
| Examples of the non-printing numbered tag in the Slide view. |
||
 |
 |
 |
| Start On Click | Start With Previous | Start After Previous |
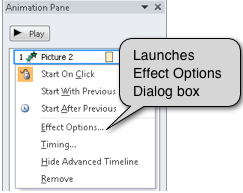
When you click on the Effect Options ..., a dialog box opens that relates to your animation. You can choose between the Effect tab, the Timing tab or the Text Animation tab. For example, if you want to dim the bulleted text, click on the Effect tab, in the After Animation: drop-down list, click on the color of your choice (Figure 4). |
 |
|
 Figure 4 |
 Figure 5 |
 Figure 6 |
Back to PowerPoint 2010 Quick Tips Index
This page was last modified
March 30, 2014
Address of this page is: http://hhh.gavilan.edu/jmaringer/PowerPoint2010/QuickTips2010/ppttip24.html