 |
Gavilan College Webpage Authoring |
Lesson
1:
HTML Basic Tags
Tags and Attributes |
|
|
Learning HTML is a simple matter of learning about 40 different tags that operate in different ways on the text they surround.
|
|
Besides the tags, there are attributes that can hang onto the opening tags. These attributes can set certain values to the tag instructions. For example, the <p> tag will start a new paragraph. If we add an align attribute, it will change the placement of the new paragraph. <p align="center">This paragraph is going The default setting is right-side justified. If you have no align attribute, the text will be aligned to the right. |
This will all make more sense when we start writing code. |
Before you start |
To create and test HTML pages, you will need a text editor and a web browser. Plain text editors include Notepad or Wordpad for Microsoft® Windows (usually hidden under Accessories), and TextEdit or Simpletext for Macs (in your Applications folder). To preview your documents, you'll need a web browser. To make sure your document looks good to the greatest number of readers, you can test your documents in several browsers. Chrome is the most widely used browser, now holding about 80.7% of the market. Firefox has dropped to 6.1%. All these statistics are from the W3Schools.com website. You can also find links to download any of the browsers free on that site. You probably already have at least one of these browsers on your computer. It's the software you're using to read this lesson. |
Your first html document |
|
|
1. Open a new document in your text editor and type in the coding below, exactly as it appears. Better yet, copy and paste it into your document. These lines are known as the DTD, or document type definition. The "doctype" begins the web page and tells the browser how to interpret the coding on the page. It also tells a validator which version of HTML to use in checking the document's syntax. We'll be using the html 4.0 strict version, which helps you make pages that are accessible to the visually-limited reader, and easily adaptable for style sheets and for different browsers. |
Hint for Mac users: If you've got some little black flags across the top of your screen (circled in red on the graphic below), it means you're in the "rich text format", which won't work for saving plain text. Pull down the Format tab and change that to Make Plain Text.
|
|
2. That doctype statement counts as our opening <html> tag, which means we need a closing </html> tag at the end. Hit return a couple of times and type in: </html> |
Your coding should now look like this: <!doctype html public "-//w3w//DTD XHTML 1.0 Strict//en"> </html> |
| Everything on your page should go between those two opening and closing <html> tags. | |
|
3. There are two parts to the information between those <html> tags: the head and the body. The head is reserved for specific information having to do with the entire page. And the body is where you put everything you want to show up on your page. First we'll open the head section, right after the doctype statement: <head> 4. And then we'll give the page a title: <title>Acme Seed Company</title> 5. Next close the head section and open the body section: </head> Remember, all this is still between the opening and closing html tags. Type in the first paragraph on your page, starting with a <p> tag: <p> Feel free to change that sentence, but keep the opening and closing p tags. 6. And finally, close out the body section. </body> That closing /body tag should be the penultimate tag in your document, the second-to-last tag, just before the closing /html tag. |
After completing steps 3 through 6, your coding should look like this: <!doctype html public "-//w3w//DTD XHTML 1.0 Strict//en"> <body> None of the bold or text colors in this coding makes any difference. I've simply bolded the tags that we're using so you can see them better, and color-coded the tags that need to be opened and closed, so you can spot the right order. Your code won't work unless it's in the right order. Also, none of the returns, or spacing make any difference. You can put in returns anywhere you like, just to make the coding simpler for you to read. |

Saving and viewing your html document |
|
| So far, this is a very boring page, but save it anyway. Click on the FILE option on the top tool bar of your text editor and choose Save As. | |
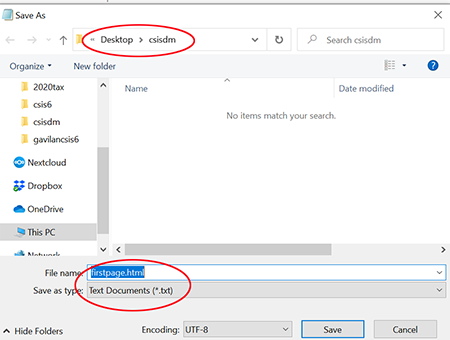
1. Save it as a "text" document, and give it this name: firstpage.html 2. Your text editor will automatically try to save the document with .txt as the ending of the document. You'll have to physically place your cursor in the name, delete the .txt, and replace it with the .html file name ending. 3. Save it to the desktop. |
 |
Next, open up a browser (Internet Explorer, Firefox, Safari, Chrome, or any other browser you might have). If you are using an AOL browser to connect to the Internet, STOP! Please see these warnings and instructions on how to avoid problems. The AOL browser is not compatable with our system (or any other system, for that matter). You'll have to download and use a different browser. |
|
|
Click on the FILE option from the top tool bar in your browser window, and highlight Open File. Or, click CTRL O to go directly to the open screen.
|
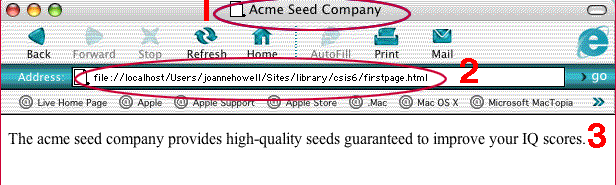
From the next screen, choose your firstpage.html file from the desktop:
|
| I told you it was
boring.
 |
|
|
But notice a few things:
|
|

More tags | |
|
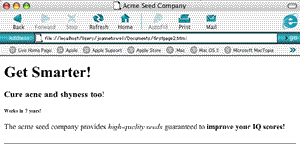
Let's add some tags to make it more interesting. 1. After the <body> tag, and before our sentence, lets add a headline. <h1>Get Smarter!</h1> The <h1> tag is a headline tag, and will tell the browser to
Note of Caution: Don't confuse headline tags with the head section. These headline tags go in the body section, not the head section. 2. Just for fun, add two more smaller headlines: <h3>Cure acne and shyness too!</h3> |
After steps 1 through 4, your coding should look like this: <!doctype html public "-//w3w//DTD XHTML 1.0 Strict//en"> And your page should look something like this:
You'll be doing a lot of this during the next 8 weeks of class --
Always remember, before you can see your changes, you need to
|
3. We can also bold individual words or phrases by surrounding them with the <b> tags. Try putting these tags around some words in the paragraph: <b>improve your IQ scores!</b> You can do the same for italics by using the <i> tags. <i>high-quality seeds</i> |
|
|
4. Let's add a horizontal bar at the end of the page. Put a horizontal rule tag just after your closing </p> tag, at the end of your sentence: <hr/>. The horizontal rule tag is one of those rare tags that don't require an open and close tag. Instead we open and close within the one tag, by putting the slash mark after the tag, instead of in front. <p> |
|
|
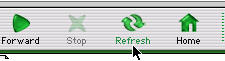
Save your page again, go to the browser, and click on the refresh or reload button.
|
|
Sometimes getting started is the hardest part -- finding a text editor on your computer, saving the text document in the right format, loading it into a web browser. If you are having problems with these first steps, please look at the video I've made for you. And if even that is unclear, meet me for a zoom meeting on one of these dates:
at this zoom address: https://cccconfer.zoom.us/s/5939641982?status=success#success If you can't work with any of these dates or times, please let me know: jhowell@gavilan.edu and we can make other arrangements to meet. |
|
 |
Coasting Downhill |
| Webpages are put together using tags. These tags have to be listed in a particular order, and most of them have to have a closing tag. All your webpages have to start with the doctype statement, like the one listed to the right. | <!doctype html public "-//w3w//DTD XHTML
1.0 Strict//en"> < html xmlns="http://www.w3.org/1999/xhtml"> |
| There are two parts to your website: the head and the body. Only certain information about the entire webpage will be listed in the head section. We've covered only the title tag. This title won't even be on your webpage; it will be way up at the top, in the frame of the browser window. | <head> |
The body section has everything that you want to show up on your page. So far, we've covered
|
<body> <h1>Get Smarter!</h1> <p>The acme seed company provides <i>high-quality seeds</i> guaranteed to <b>improve your IQ scores!</b> </p> <hr/> </body> |
Try not to confuse the head section with the headline tag.
|
|
| The last two tags in your document should always be the closing body and html tags. When the browser reads that final tag, it quits reading. | </body> </html> |
|
Congratulations! You've made it through your first webpage. You have two more small jobs to do before you're finished with this lesson.
|
![]()
Address of this page:http://hhh.gavilan.edu/jhowell/csis6/1.html
Last updated
June 3, 2021
For questions please contact Jo Anne
Howell at
jhowell@gavilan.edu